Hey! You must want to learn more about GameMaker…
This guide will go over everything there is to know about the basics of GameMaker, from how to join a map and rate it to creating a map and understanding the build menu!
You may select a topic below to skip straight to it:
 Ranks
Ranks 
GameMaker has three ranks, and one is free! You also have your global rank.
Here are our ranks and all the benefits you can receive from purchasing or voting for one:
Click me!
[Voter] Benefits:
- Ability to use create maps using templates
- Ability to host parties
- Access to additional WorldEdit commands:
- //pos1
//pos2
//drain
//wand
//set
//replacenear
//replace
//undo
//redo
//copy
//cut
//paste
//fixlava
//fixwater
//move
//center
//removenear
//stack
//place
//flip
//rotate
- //pos1
[Maker] Benefits:
- All Voter rank perks
- Ability to host private games
- 30 total map slots
[Maker+] Benefits:
- All Voter & Maker rank perks
- Access to 128x128 maps
- 100 total map slots
- Access to additional WorldEdit commands:
- //walls
//fill
//butcher
//hollow
//smooth
//expand
//shift
//contract
//outset
//inset
//pyramid
//sphere
//cyl
//up
//ascend
//descend
//j
//thru
//brush
//tool
- //walls
Global Rank Benefits:
The global rank Legend gives you access to colour chat on GameMaker! Global ranks may be given more benefits in the future.
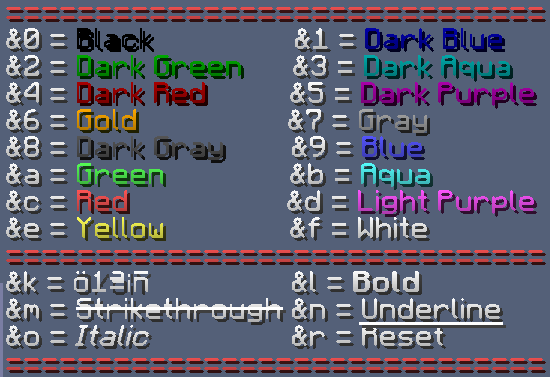
Here’s a handy image that tells you all the color codes you can use:
Purchase ranks from the store at shop.munchymc.com!
 Main Menu
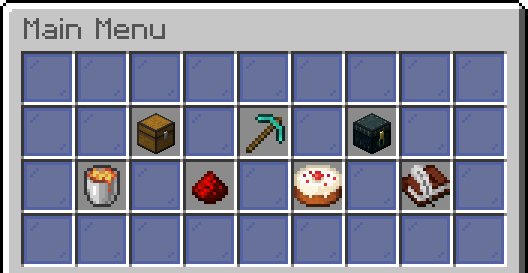
The Main Menu is the most important part of GameMaker! It’s where you access everything.
Click for more info
![]()
Clicking the chest will bring you to a GUI where you may view and edit all your maps.
![]()
Clicking the pickaxe will take you through two steps: Naming your map, and then choosing a size. Once you have done this you will have a map to build and create on. Learn more about coding by going to the Creating Maps topic.
![]()
Clicking the ender chest will bring you to a GUI where you can view all public maps and join them. You may filter by players, latest, name and diamonds using the player head at the top.
![]()
Clicking the lava bucket will bring you to all your deleted maps. These are saved for 2 weeks before being permanently deleted. Clicking a map in here will restore it, to learn how to delete a map read the Danger Zone topic.
![]()
Clicking the redstone dust will bring you to a GUI where you may view all templates created. Templates are maps published by staff members that are meant to speed up the process of creating maps. Templates require the [Voter] rank.
Many templates also make use of shortcuts! Learn more by going to the Shortcuts topic.
![]()
Clicking the cake will open a GUI where you can spend your cakes! Learn more about what cakes are and how to get them by going to the Cake Shop topic.
![]()
Clicking the book & quill will bring you to a GUI with archived maps! We don’t know much about this feature yet…
 Cake Shop
The cake shop is where you spend your cakes!
To learn how to get cakes go to the Map Menu topic.
- [Maker] (14 days) - 250 Cakes
- [Maker] (30 days) - 500 Cakes
- [Maker+] (14 days) - 500 Cakes
- [Maker+] (30 days) - 1000 Cakes
 Playing Maps
What’s a GameMaker without games to play? Learn more about searching maps here!
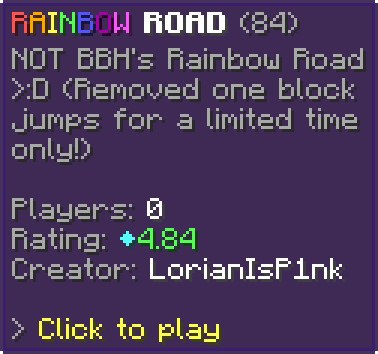
There’s 6 important stuff to take note of:
- The Map Title - This tells you what the map is!
- The Map ID - Have issues with your map? Give a moderator your map’s ID!
- The Map’s Description - This tells you more about the map!
- The Map’s Player Count - How many players are currently on it!
- The Map’s Rating - What people think of it!
- The Map’s Creator - Who created it!
 Map Menu
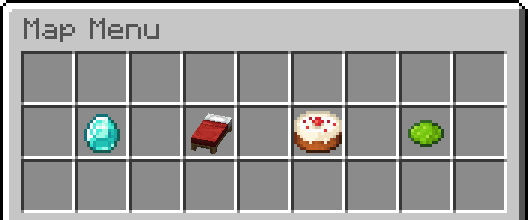
The Map Menu allows you to interact with the maps you play!
Click for more info
![]()
Clicking the diamond will bring you to a GUI where you may rate the map from 1 to 5!
![]()
Clicking the bed will send you back to the main lobby!
![]()
Clicking the cake will give the map’s creator a cake!
![]()
Clicking the dye will hide all other players! Click it again to show them.
 Build Menu
The build menu is the most important menu!
You access everything from here when creating and coding a map.
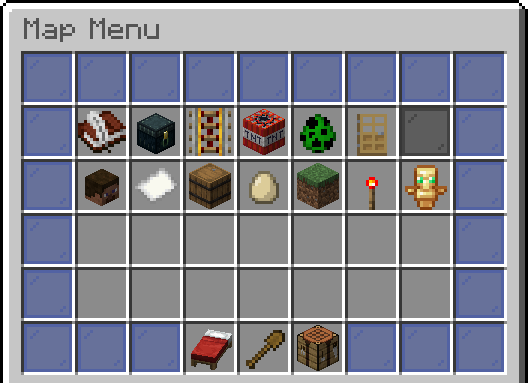
Click for more info
![]()
Clicking the bed sends you to the main lobby!
![]()
Clicking the shovel sets you to play mode! Click it again to switch to build mode.
![]()
Clicking the crafting table reloads your map! This is effectively leaving your map and rejoining it.
![]()
Clicking the book & quill takes you to the properties GUI!
Learn more by going to the Properties topic.
![]()
Clicking the ender chest takes you to the scoreboards GUI!
Learn more by going to the Scoreboards topic.
![]()
Clicking the rail takes you to the functions GUI!
Learn more by going to the Functions topic.
![]()
Clicking the TNT takes you to the danger zone GUI!
Learn more by going to the Danger Zone topic.
![]()
Clicking the spawn egg takes you to the entities GUI!
Learn more by going to the Entities topic.
![]()
Clicking the door takes you to the furniture GUI!
Learn more by going to the Furniture topic.
![]()
Clicking the stained glass takes you to the GUIs GUI!
Learn more by going to the GUIs topic.
![]()
Clicking the player head takes you to the heads GUI!
Learn more by going to the Heads topic.
![]()
Clicking the paper takes you to the info GUI!
Learn more by going to the Info topic.
![]()
Clicking the barrel takes you to the inventory layouts GUI!
Learn more by going to the Inventory Layouts topic.
![]()
Clicking the egg takes you to the items GUI!
Learn more by going to the Items topic.
![]()
Clicking the grass block takes you to the regions GUI!
Learn more by going to the Regions topic.
![]()
Clicking the redstone torch takes you to the shortcuts GUI!
Learn more by going to the Shortcuts topic.
![]()
Clicking the totem of undying takes you to the teams GUI!
Learn more by going to the Teams topic.
 Properties
Properties are arguably the most important part of creating a map!
Learn all about them here, and what each system property does!
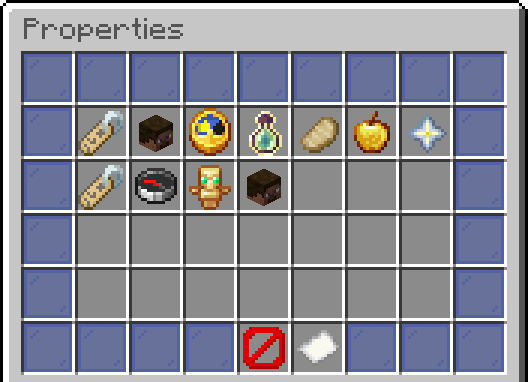
Click for more info
System Properties:
![]()
The “system_map_name” property is used to display your maps name!
Use this in a scoreboard or title by using the placeholder:
%p_system_map_name_global%
![]()
The “system_map_player_count” property is used to display your maps player count!
Use this in a scoreboard or title by using the placeholder:
%p_system_map_player_count_global%
![]()
The “system_map_timer” property is used to time how long someone has played your map!
Use this in a scoreboard or title by using the placeholder:
%p_system_map_timer_global%
![]()
The “system_player_experience” property is used to display the player’s experience!
Use this in a scoreboard or title by using the placeholder:
%p_system_player_experience_player%
![]()
The “system_player_food_level” property is used to display the player’s hunger!
Use this in a scoreboard or title by using the placeholder:
%p_system_player_food_level_player%
![]()
The “system_player_health” property is used to display the player’s health!
Use this in a scoreboard or title by using the placeholder:
%p_system_player_health_player%
![]()
The “system_player_level” property is used to display the player’s level!
Use this in a scoreboard or title by using the placeholder:
%p_system_player_level_player%
![]()
The “system_player_name” property is used to display the player’s name!
Use this in a scoreboard or title by using the placeholder:
%p_system_player_name_player%
![]()
The “system_player_ping” property is used to display the player’s ping!
Use this in a scoreboard or title by using the placeholder:
%p_system_player_ping_player%
![]()
The “system_player_team_name” property is used to display the name of the players team!
Use this in a scoreboard or title by using the placeholder:
%p_system_player_team_name_player%
![]()
The “system_team_member_count” property is used to display the team count of a team!
Use this in a scoreboard or title by using the placeholder:
%p_system_team_member_count_team%
Creating Properties:
Creating properties is very important, as system properties only have specific uses and cannot be edited!
There are two steps that go into creating a property: Naming it, and choosing what type of property it is going to need to be.
- Location - Used to save a location as a property!
- Material - Used to keep track of a specific type of material!
- Decimal - Used to save a number with decimals!
- Timer - Used to time the player!
- Number - Used to save a number!
- Date and Time - Used to save a date and time!
- String - Used to save words!
- Boolean - Used to save a true or false value!
Editing Properties:
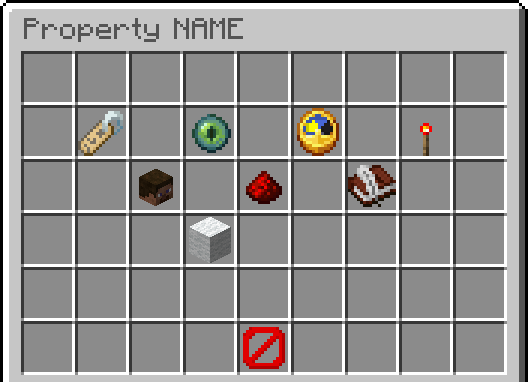
Once you have your own property, you will be brought to the above menu!
- Clicking the name tag will allow you to change the properties name!
- Clicking the ender eye will allow you to change the default value!
- Clicking the clock will allow you to change how long the value lasts!
- Clicking the redstone torch will allow you to set whether it is persistent or not!
- Clicking the player head will show you each players value!
- Clicking the redstone dust will show you how to display this property in scoreboards!
- Clicking the book & quill will allow you to set a description for this property!
- Clicking the wool will allow you to change the icon of this property!
A property can be displayed in scoreboards, titles, actionbars, name tag prefixes & suffixes and anything else that uses text.
 Groups
You can use these groups to grant specific permissions to players such as:
Access to all individual Menus
WorldEdit
Default Game Mode
Building
 Scoreboards
Scoreboards are super useful for displaying information!
You may display properties, map info and anything else!
Click for more info
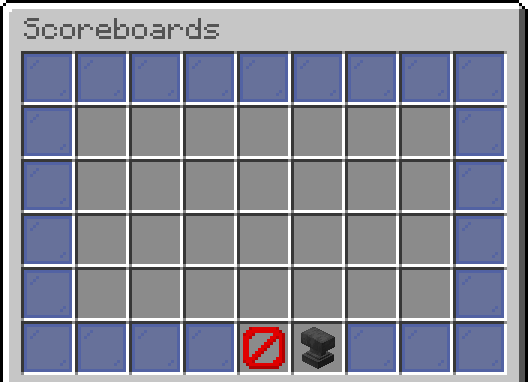
Once you are on the above menu, select the anvil! This will allow you to name a scoreboard, and then create one.
Editing a scoreboard is pretty simple! You may use property placeholders to display different properties, and even use colour codes to make it look all fancy! Scoreboards have a maximum of 11 lines though so keep that in mind!
Here’s a handy image that tells you all the color codes you can use:

 Functions
Functions are pretty hard to learn, but are super useful once you’ve got a hang of it!
Since functions are pretty confusing this will be pretty long!
Click for more info
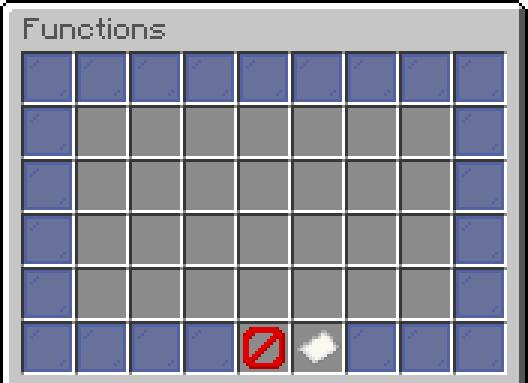
Once you are on the above menu, select the paper! This will allow you to name a function, and then create one.
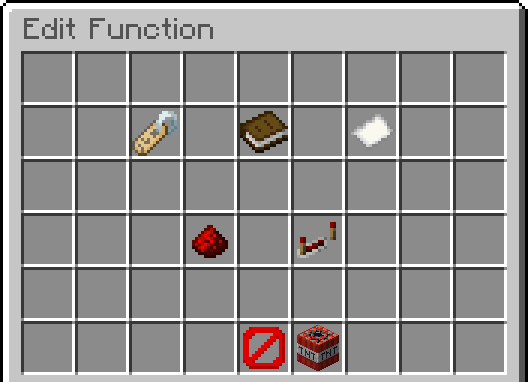
Once you have created your function you will see the above menu!
Here is what each item does:
- Clicking the name tag will allow you to change the name
- Clicking the book will allow you to change the description
- Clicking the paper will allow you to change the icon
- Clicking the redstone dust will allow you to set actions (more on this later!)
- Clicking the comparator will allow you to set how often this function repeats, leave it alone to make the function only execute when it’s called. Set the value to 0 to disable repeating.
Adding Actions to the Function:
Clicking the redstone dust will open the actions menu! In here you may click the paper at the bottom to add in actions to the function. GameMaker has over 45 different actions to choose from, so you can definitely make some fancy stuff!
You may execute the function by either using the “Call Function” action or by setting it to repeat every so often.
 Danger Zone
The Danger Zone currently has two items!
- Log Level - The log level has four different levels: Severe, Debug, Info & Warning.
- Delete Map - This obviously deletes your map! If you delete your map it will be sent to the trash. Learn more about trash (and how to restore your map) by going to the Main Menu topic.
 Entities
Entities are super fun to mess around with, and are also very useful to make maps with!
Click for more info
Once you have clicked on the Entities menu you will see a paper!
Once clicking this paper you will be given 65 different mobs to pick from.
I am going to be using a zombie.
Once you have selected an entity, you will be asked to name it! Once you have named it you will be brought to a GUI with two items:
- Clicking the name tag will allow you to change the entities name
- Clicking the paper will open this entities configuration.
Opening the entities configuration will show you a ton of possible stuff you may change.
Here is a list of what you may change with a zombie:
- Nametag
- Maximum Air
- Invulnerable
- Potion Effects
- Can Pickup Items
- AI
- Collidable
- Invisible
- Equipment
- Can Open Doors
- Aware
- Aggressive
- Baby
- Can Break Doors
- Should Burn in Day
Entities can be summoned using the Spawn Custom Entity action.
 GUIs
GUIs 
GUIs are very cool to make, and can make your map super fancy!
Click for more info
Once you have clicked on the GUIs menu you will see a paper!
Clicking this paper will allow you to name a GUI and then create one.
Once you have created a GUI, you will be shown the below menu:
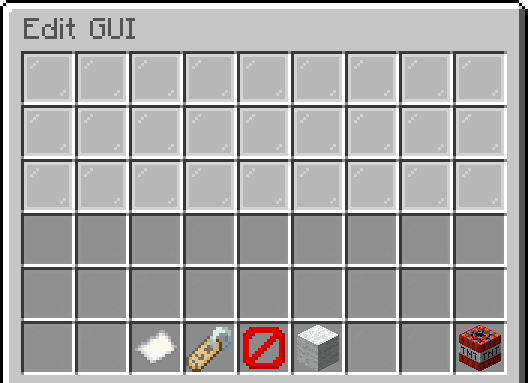
The white stained glass is the GUI, and there are three items you may click:
- Clicking the paper will allow you to change how many rows the GUI has, from 1 to 5.
- Clicking the nametag will allow you to change the GUIs name
- Clicking the wool will allow you to change the GUIs icon
Clicking on a white stained glass will allow you to create an item to display there! You will create an item in that slot of the GUI, and then taken to the below menu:
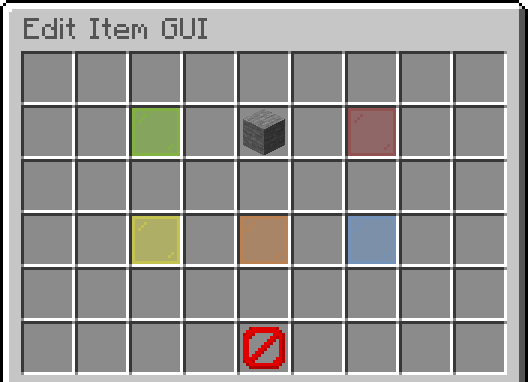
Each glass pane can have a different function attached to it which executes when a player performs a certain event.
- Lime Pane: When the player left clicks the item.
- Red Pane: When the player right clicks the item.
- Yellow Pane: When the player shift left clicks the item.
- Orange Pane: When the player shift right clicks the item.
- Blue Pane: When the player drops the item.
Clicking the stone will bring you to the below menu, and then you can edit the item:
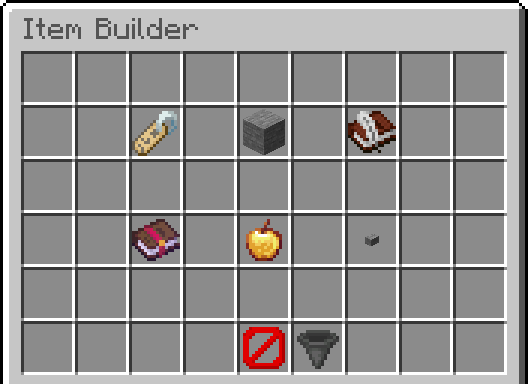
Here is what each item does:
- Clicking the name tag allows you to name the item
- Clicking the stone allows you to change what item it is
- Clicking the book & quill allows you to change the items lore
- Clicking the enchant book allows you to enchant the item
- Clicking the golden apple allows you to fake enchant the item
- Clicking the button allows you to change the amount of the item
- Dropping an item onto the hopper allows you to set an item that way
Once you have created a good looking GUI, use the Open GUI action to open a GUI for a player.
 Heads
Heads 
You may access over 75,000 different custom player heads to decorate your map with here!
 Info
Info 
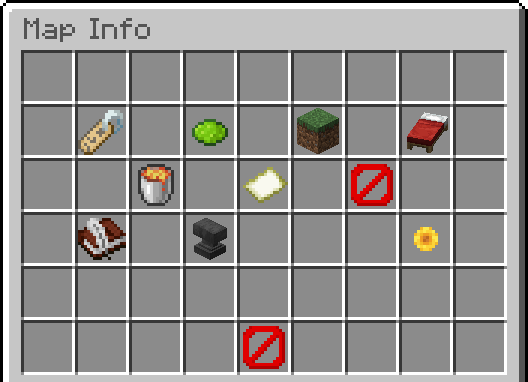
Info is a super important menu, as it has a ton of settings.
Click for more info
![]()
Clicking the nametag allows you to change your maps name!
![]()
Clicking the red dye allows you to set your map to public!
![]()
Clicking the grass block allows you to set your maps icon!
![]()
Clicking the bed allows you to set your maps spawn!
![]()
Clicking the lava bucket allows you to set the minimum Y level of your map!
![]()
Clicking the map allows you to increase your maps size!
![]()
Clicking the barrier allows you to set whether your map resets automatically when you leave or enter playmode!
![]()
Clicking the book & quill allows you to set your maps description!
![]()
Clicking the anvil allows you to go select the minimum version of your map!
![]()
Clicking the paper allows you to enable or disable local chat for your map!
![]()
Clicking the sunflower allows you to give your map tags!
 Inventory Layouts
Inventory Layouts are super useful for PVP games, or games that involve items!
Click for more info
Once you have opened the inventory layouts menu, you will see a paper!
Clicking this paper will allow you to name a layout, choose a type and then create one!
You will then see three items:
- Clicking the name tag will allow you to rename the layout
- Clicking the wool icon will allow you to set an icon
- Clicking the chest will take you to a GUI to set up the layout
Clicking the chest will take you to this GUI:
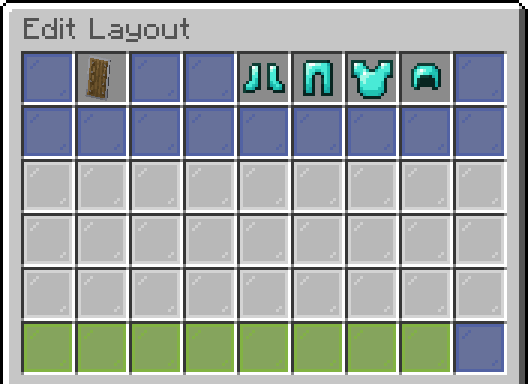
The shield is the players offhand, the armor is their armor slots, the white stained glass is their inventory and green stained glass their hotbar!
Clicking on any of those items will let you choose whether to create your own item, or choose from your premade items.
To learn how to create your own item check out the GUIs Topic.
To learn how to create your own premade items check out the Items Topic.
 Items
Items 
Items are very useful. To find out why checkout the more info!
Click for more info
Once you have opened the Items menu, you will see a paper!
Clicking this paper will allow you to name the item, and then create it!
To learn how to create an Item you can checkout the GUIs topic, they use the same system!
The only difference is an enderpearl icon, this allows you to set whether the item is movable in the players inventory or not.
Items can also be used to prevent you from having to create the same item multiple times for inventory layouts.
 Regions
Regions are the most important part of GameMaker!
You can’t make much without them.
Click for more info
When you open the Regions menu, you will see the global region! This region cannot be deleted and is your whole map.
To create your own region, you must select a point 1 and point 2 using the ///wand and then click the wooden axe. Once you have created a region you will see the menu below:
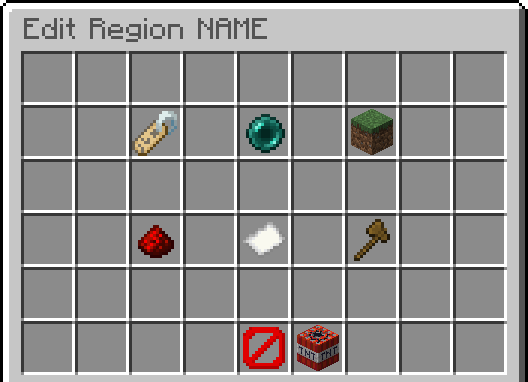
This menu has 6 items!
- Clicking the nametag allows you to change the regions name
- Clicking the ender pearl teleports you to the region
- Clicking the grass block allows you to change it’s icon
- Clicking the redstone dust opens the events GUI, more on this later
- Clicking the paper opens the flags GUI, more on this later
- Clicking the wooden axe allows you to redefine the region
Opening the flags GUI allows you to edit that regions flags! There are currently 20 flags to mess around with.
Opening the events GUI lists 10 different types of events! Events are a set of actions that execute when a player DOES something. Here is a list of events:
- Player Block Interact - Executes when the player interacts with a block!
- Player Death - Executes when the player dies!
- Player Enter - Executes when the player enters the region!
- Player Group Change - Executes when the player’s group changes!
- Player Hit Player - Executes when the player hits another player!
- Player Join - Executes when the player joins the map!
- Player Kill - Executes when the player gets a kill!
- Player Leave - Executes when the player leaves that region!
- Player Quit - Executes when the player leaves your game!
- Player Respawn - Executes when the player respawns!
- Block Broken - Executes when a block is broken!
- Block Placed - Executes when a block is placed!
- Player Hit Entity - Executes when the player hits an entity!
- Entity Hit Player - Executes when an entity hits the player!
- Entity Hit Entity - Executes when an entity hits an entity!
- Entity Death - Executes when an entity dies!
- Entity Enter Region - Executes when an entity enters a region!
- Entity Leave Region - Executes when an entity leaves a region!
- Entity Spawn - Executes when an entity spawns!
- Left Click Entity - Executes when the player left clicks an entity!
- Right Click Entity - Executes when the player right clicks an entity!
- Player Right Click Player - Executes when the player right clicks another player!
- Player Left Click Player - Executes when the player left clicks another player!
Inside each event you may set actions that execute! You may also configure some events to make them execute for certain blocks, whether they execute for the killer or player and many other stuff.
 Shortcuts
Shortcuts are super useful for templates, and also just for organizing your map!
Click for more info
Once you have opened the shortcuts menu and created a shortcut you will see this menu:
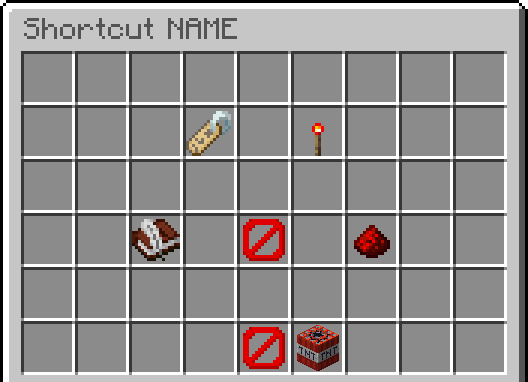
There are 5 items!
- Clicking the nametag changes the shortcuts name
- Clicking the redstone torch changes the shortcuts icon
- Clicking the book & quill changes the shortcuts description
- Clicking the barrier sets whether the shortcut closes the menu after use or not
- Clicking the redstone dust allows you to set up the shortcut, and where it should go
When setting up the shortcut you may be a bit confused, as you get sent back to the main menu! From this menu you should navigate to where you want the shortcut to take the player when they click it, and then press ESC once you’re there. This will save the shortcut’s steps.
 Teams
Teams 
What’s a GameMaker if you can’t have super cool teams?
Click for more info
Once you have created a team, you will be greeted with this menu:
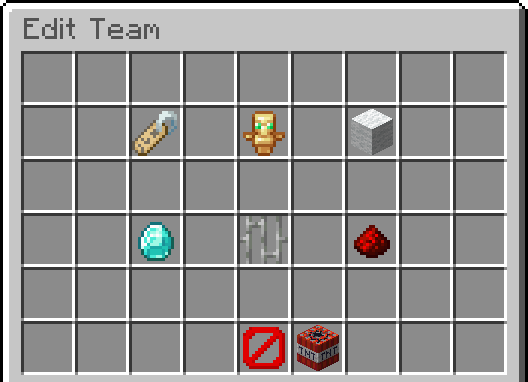
This menu has 6 items!
- Clicking the nametag allows you to change the teams name
- Clicking the totem of undying allows you to change the teams icon
- Clicking the wool allows you to change the teams colour
- Clicking the diamond sets whether to persist players or not
- Clicking the iron bars opens team options
- Hovering over the redstone dust shows how to display the team in a scoreboard
After clicking on the iron bars, you will see this menu:
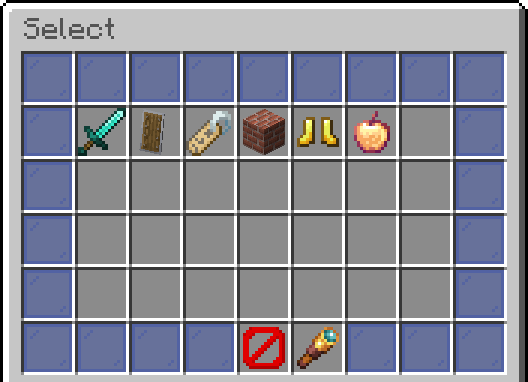
This menu has 6 different team settings!
- PvP True/False
- Friendly Fire True/False
- Nametag Visible True/False
- Build True/False
- Fall Damage True/False
- Invulnerable True/False
Teams can be set using the “Set Team” action! What player the team is on can also be checked using the “Conditional” action, so you could make it so if the player is on red team they die and if not nothing happens!
 Extra Information
Extra information that does not fit in anywhere else!
-
Important information will be displayed on holograms in the lobby!
-
Too lazy to type /hub? There’s a portal behind spawn!
-
I found a bug, what do I do? Create a forums post with the bug, send it to any GameMaker staff member, or create a ticket here!
-
Who’s GameMaker staff? Checkout our staff here! Our staff will have the
 symbol.
Have any questions? Leave them below!
This guide will be updated continuously, so if there’s something missing let me know!
